
We’re going to talk about doing two things at one time and that’s using the bi-directional controls on your scan tool and the scope at the same time. To do that. We’re going to use the Autel Maxisys MS919 and we’re also going to show you how to do it on the maxi sys ultra on the ms919.
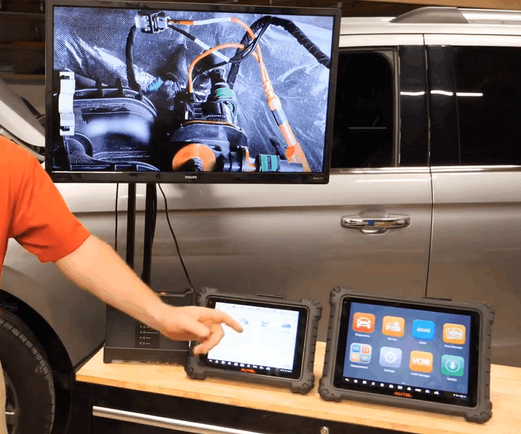
It does come with the vcmi. This gives us the ability to not only communicate with the vehicle via the obd2 port, but also to use the scope functions. This has a four channel lab scope built into it, so we can use both of those at the same time, and you can see, I got a camera set up right here. That is the camera underneath the hood, so you can see the evaporative emissions solenoid and what we’re going to do is we’re going to bi-directionally control the pulse width, modulation on that solenoid, while watching it on the scope, I’ve already connected to the vehicle- and I am connected via wi-fi to our vcmi, that gives us the best speed to be able to use the scope and to be able to use the obd2 port at the same time, I’ve already id’d this vehicle as a ford expedition. It’s got the 3.5, v6 twin turbo monster of an engine in it and what we’re going to be doing is we’re going to be actuating.
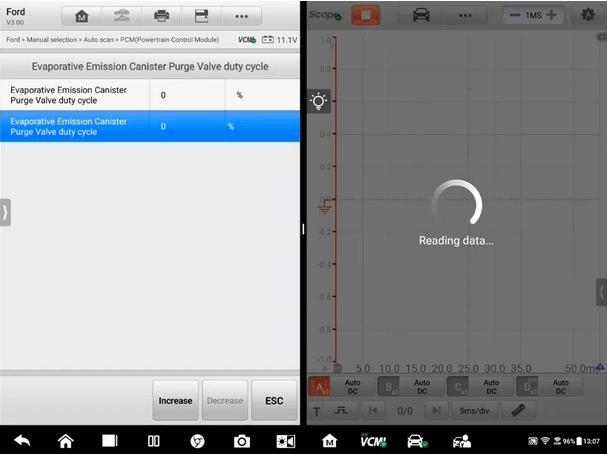
The canister purge valve solenoid, which is pulse width modulated, and we can do that on the bi-directional side of the scan tool and we’re going to use the scope built into the vcmi to check that and make sure that everything is functioning properly. So let’s talk about hookup first, so I’ve connected the vcmi to the vehicle via the obd2 port and I have connected the scope, lead a channel, a which is red directly in line with that evaporative emission solenoid- and you can see here that I have two pigtails and I’ve done it in line here is our plug. Here’s, the solenoid and I’ve done that with these connectors that are provided in the box, so these are pin out connectors and what you’ll see is they have a male and a female end on them. So I can use these in line. They come apart and you can use each individual one, you can use them in line to test the circuit, so that gives us the ability to hook our scope to that without having to back probe or pin in or pierce a wire. It gives us a good option to be able to access that network without having to interrupt that network as far as a back probe or a pin. Now, if you have an intermittent issue going on sure, it may be right to back probe that wire or it may be right to to pierce that wire. In this case, it’s just just an example, and I wanted to show you how you can use these connections as well. What we’re going to do on our scan tool using the ms919, we’re going to go into our pcm module and we’re going to go ahead and select active test now.
The key is on on this vehicle and down here in the bottom corner: you’re going to see evaporative emissions canister purge valve duty cycle, I’m going to go ahead and select that one. It asks me if I want to see any live data at this time, I don’t need to see any live data, we’re going to click cancel. Now we can see that we have our canister purge valve solenoid and our duty cycle information on the screen. This is going to give us what percentage of duty cycle we have put this canister purge valve solenoid at, and we can then use the scope to be able to verify that that information is correct, so we’re going to switch over to the scope using the ms919.
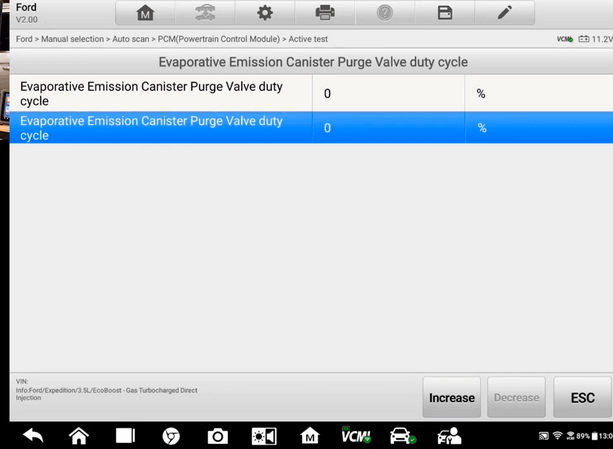
We can do that by pushing the two sheets of paper that are on top of each other. If we’ve already opened our scope module, we can go right to that and you can see our scope is running and we have a consistent signal coming out of that network. There’s no pulse width going on on that. Currently so I’m going to push our sheets of paper again, I’m going to go back into our duty cycle and I’m going to increase that to 50. I can select our sheets of paper go back to our scope and you can see now that we have a duty cycle going across our scope, if we want to trigger off that and pause it, we can. We can pull our trigger up here and that will trigger off of the trace, as it goes across the screen to hold it steady for us.
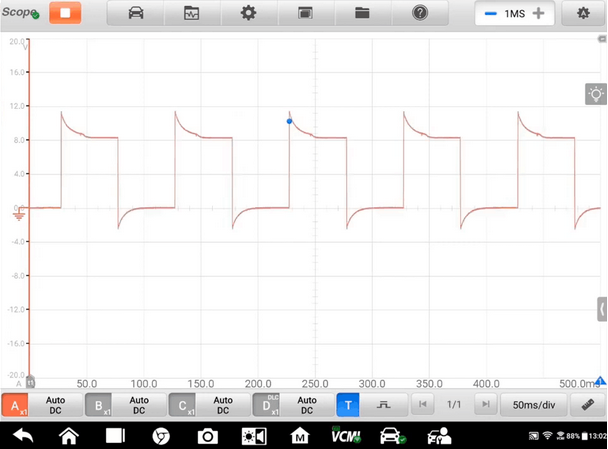
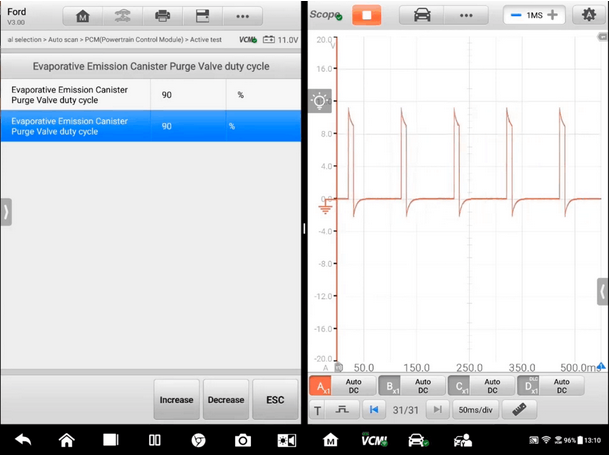
If we want to adjust our time base to be able to see more or less of that, there’s a button down here at the bottom, we can select that and change how many milliseconds we are seeing on the screen, and now you can see a lot more data all at one time, if you want to pause that you can by pushing the stop button up here at the top, and then we can go a screen back to be able to see all that information on that screen and from there we can zoom in and see those modulations a little bit more clear. So, let’s see, if there’s a difference, let’s speed that up. Let’s take that to a higher duty cycle. If I push our sheets of paper, I can go back and I can increase. Let’s go to ninety percent and then I can take our sheets of paper again, go back to our scope and as it resets we’ll push the play button here and there is our 90 percent duty cycle.
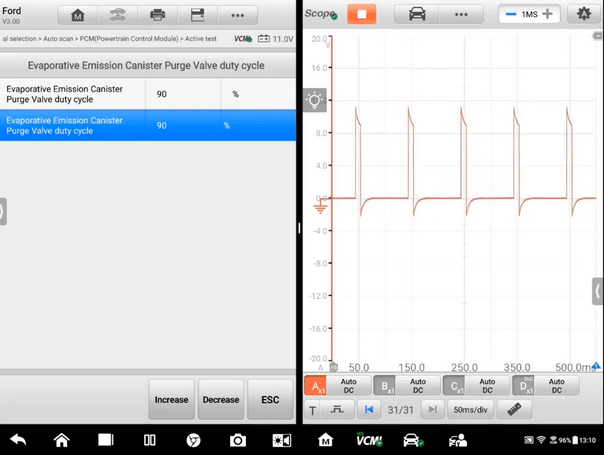
So you can see that both will run at the same time. But you just have to switch between screens to be able to do that now, if you want to run both of them at the same time, and you want to see them both on the same screen. Well, we can do that as well, and that is a feature of the maxi says ultra, so the maxis ultra has all these same features as the ms919. However, we can run a split screen on that, so let me get that set up and I’ll show you how that works. Now I have the maxi says: ultra set up to the same place that we were just at I’ve selected, the evaporative emissions canister purge valve solenoid and I have it set on duty cycle and actually I’ve connected to the same vcmi. So I didn’t have to reset and re-hook everything just making it that much easier. Now, let’s get the scope set up. I didn’t show you that on the 919 but I’ll show you how we do that on the ultra, so what I can do is I can select split screen, which is the pause button down here at the bottom. We can select measurement and turn on the oscilloscope. Now you can see that both sides of the tool are running. At the same time, we have the bi-directional control of the active test over here and we have the scope setting up on this side.
Now you can see that we have our 8 volt reference that we had going on before. So that’s the voltage going from that computer to the canister purge valve solenoid and we’re going to increase that we increase it to 10 percent and there is our duty cycle right there on the screen. I have a set at 50 milliseconds per division, to be able to see the most information on that display. Let’s go ahead and increase this to 50 percent, and you can see every time that I increase that that gap gets a little bit bigger and a little bit bigger. Now, if you were over here on the vehicle side, you could actually feel that clicking and ticking and as I go faster and faster duty cycle increases, going to go all the way up to 90. And you can see our complete duty cycle change all the way from 10 percent to 90.
So we can verify that the computer has full control of this canister purge valve solenoid, and we can also confirm that the purge valve solenoid is working if we wanted to add smoke to it and we can see that smoke come out at higher rates. So a lot of cool features and functions built into the tool and to be able to see both at the same time is a great feature on the maxi sys ultra. But don’t forget, the ms919 has the same features, just not the split screen, so we can still run the bi-direction control flip right over to the scope without having to reset everything up every time to see.
What’s functioning and working properly,
Leave a Reply